
vectorplexus.com is at https://vectorplexis.com until further notice.
×
Leaderboard


Popular Content
Showing content with the highest reputation since 06/06/2016 in Posts
-
38 pointsView File High Poly Head High poly heads for all playable vanilla races based on the vanilla head meshes (male and female). A simple name for a not-so-simple mod. Available for both LE and SE. Features smooth high poly male and female heads complementary high poly brows, beards, scars, and hair to fit new head shape includes morphs for RaceMenu's extended sliders compatible with vanilla-based head textures compatible with existing presets for the vanilla male/female head meshes (excluding sculpt data) Requirements RaceMenu (LE, SE) Expressive Facegen Morphs (LE, SE) [optional] Expressive Facial Animation Male Edition (LE, SE) [optional] Expressive Facial Animation Female Edition (LE, SE) [optional] Installation Use a mod manager to install the original .zip file and follow the install script for easy installation. Do not manually extract anything. Manual Installation 00 - Base mod (required) 01 - Loose files needed for FaceGen creation in the Creation Kit (optional) 02 - no Dawnguard DLC (optional) 03 - vampire head fix (optional) 04 - remove sunken vampire face morphs (optional) 05 - symmetrical eye sockets (female) (optional) 06 - adds Aesthetic Elves (optional) 07 - adds Expressive Facegen Morphs (optional) 08 - adds Expressive Facial Animation Male edition (optional) 09 - adds Expressive Facial Animation Female edition (optional) 10 - adds high poly vanilla hair as optional replacers (optional) Usage For the player character Use the Face Part slider in RaceMenu to switch to the high poly head. If the head turns dark, change the player weight to force the skin shader to update. Don't forget to also change the vanilla brows/beard/scars to the included high poly versions. For NPC/follower mods Add this mod as a master and then swap the vanilla head parts with the high poly version Generate new FaceGen data (Ctrl + F4) in the Creation Kit. This method does not work for sculpted head meshes. Known Issues minor clipping with certain vanilla hair meshes eyes/scars appear darker than vanilla in SE. can be fixed by changing player weight. changing to vampire race will reset the high poly head back to vanilla eye mesh may have flickering/rendering issue after switching to high poly head. can be fixed by closing RaceMenu and opening it again. Modder Resource (xEdit Scripts) Skyrim - KL Filter Race.pas Filters NPC records based on races supported. Skyrim - KL Swap Headparts.pas Swaps vanilla head part records for their high poly versions. Custom head parts are not supported. Requires High Poly Head.esm to be loaded into xEdit. Skyrim - KL Copy NPC Protected Status.pas Copies NPC Protected status found on all plugins currently loaded (eg. NPCs Protected Redux.esp) Tools Used 3DS Max Nifskope Animation Tools N2 Permissions You may use this mod for your NPC/follower mods that will be shared with others. For clarification, these NPC/follower mods may be uploaded to other sites. You may add extra RaceMenu morphs. You are not allowed to modify (in part or in whole) and claim it in its entirety as your own. You are not allowed to reupload this mod to other sites. For other usage not mentioned, please ask me first. Credits Niroku for Expressive Facegen Morphs and Expressive Facial Animation tktk1 for Enhanced Character Edit head mesh reference ruddy88 for Aesthetic Elves Submitter KouLeifoh Submitted 12/19/2019 Category The Elder Scrolls V: Skyrim Special Edition compatible Yes Created by
-
37 pointsRefitting Guide for SAM - Shape Atlas for Men This guide will cover a straightforward method to refit armors for SAM. If you've visited this page before, then you might notice the guide has been rewritten. I decided to invest the time to rewrite it since the method was still a bit cumbersome. Thank you to those who pointed out this method since it's quite a bit more refined than the previous. Like I said before, I'm like anyone else and I only learned by other people or by tutorials. I'm not the ideal person to write a guide for this, but since nobody else is doing it I thought something is better than nothing ?. At least with this, people can learn to do their refits even if it's not the best way. The credit for the meshes provided in the bodyslide files goes to VectorPlexus and the others who worked on SAM, as well as KouLeifoh for the high poly and HDT ones. Requirements NifSkope (The version used at the time of writing is version 2.0, Dev 7) BodySlide and Outfit Studio (The version used at the time of writing is 4.8.0. Future versions may or may not be compatible with this tutorial.) CalienteTools Legendary Edition.7zor CalienteTools Special Edition.7z (choose based on which version of skyrim you are making your refit for) Something to refit Part A: Setting Up ⭐1A. If you are working with an outfit for Legendary Edition, you need to open it up in NifSkope first and check the consistency flags. Open the _1.nifs of your outfit and expand any NiTriShapes (If your outfit does not have a _1.nif and just has one nif for each part instead, then just use that.). Click on NiTriShapeData and in the lower window, look for Consistency Flags. Change the flag to CT_MUTABLE if it is not set to that already. Make sure that every NiTriShape in your outfit has the consistency flag set to CT_Mutable and save. If your outfit is for Special Edition, skip this step. ⭐2A. Find the Caliente Tools Legendary Edition.7z or Caliente Tools Special Edition.7z file that you downloaded from this post earlier (in the Requirements section.) Extract the Caliente Tools folder to the same place as your BodySlide installation. ⭐3A. Open up BodySlide. Find the Settings button and look towards the bottom of the new window where it says "Reference Skeleton." Change the reference skeleton to the skeleton that you are using for males. This is very important or else you will get gaps on your body. Press "Ok" when you are finished. ⭐4A. In the Outfit/Body menu, you will notice a drop down list with 10 options for you to choose from. Choose the option which best suits your needs. Guide to Outfit/Body options: Part B: Refitting the Outfit ⭐1B. Now Outfit Studio should be open and we can see our body and the parts that make it up. We need to figure out which parts we will keep and which ones we don't need. Choosing a Reference and Deleting Unnecessary Body Parts ⭐2B. Import the outfit which you will be refitting into the window. If your outfit has both a _0.nif and a _1.nif then we prefer to use the _1.nif. If your outfit only has one .nif mesh, then just use what you have. You can either drag the nif into the window or you can go to File > Import --> From Nif and select the outfit. If your outfit came with any body parts of its own, delete them. We will replace them with SAM body parts. If your outfit has any parts that you don't want to keep, you can delete them. Now you will see your body, and your outfit in Outfit Studio together. ⭐3B. Select the pieces of your outfit only. Do not highlight any parts of the SAM body. You can select multiple parts by holding the CTRL key while you click them. After you have selected the parts, go to Slider > Conform SELECTED. ⭐4B. Now we are ready to refit. Make sure that SAMBody is not selected while you are refitting the outfit. Select the parts of the outfit and use the tools along the top of the window to make the outfit fit the body. There are many, many videos of people fitting armors in outfit studio that you can watch to get an idea of what you should be doing. I know that so many tools and settings can be overwhelming at first, so I've highlighted the most important ones that you should be looking at. The one you will probably use 90% of the time is Inflate. There are other tools that you can use, but for the basics these are really all you need. I just want to give you an idea of where to focus. Now, we need to make adjustments under 4 different conditions: With None of the sliders activated With Samson slider activated With Samuel slider activated With Weight 1 to 0 slider activated (if you want your armor to work with the weight slider) ⭐5B. When you're satisfied with how it looks, deactivate all sliders. ⚠️ Notice: At this point, if you were refitting gloves or boots, you should delete SAMBody. SAMHands or SAMFeet you can delete only if the gloves or boots would fully cover the hands or feet. If you are confused whether or not to leave SAMHands or SAMFeet, there is an example below using the feet. The concept is the same with gloves. Part C : Saving the Project Now we have our outfit properly refitted, and we need to save all the files so that we can get it into our game. ⭐1C. Go to File > Save Project As... A new window will appear. Follow closely what you need to enter here, because if you enter something incorrectly then your outfit will not work. ⭐2C. Where it says Display Name, you can put whatever you want to name this project as. Click the To Project button after you are done entering a name. ⭐3C. Next, where it says Output File Name, you must enter the name of the original .nif file which you started with. For example, if we started with tutorialoutfit_1.nif we must enter tutorialoutfit ⭐4C. Where it says Output Data Path, you must enter the data path to the original file which you started with. For example, if the outfit is in Skyrim\data\meshes\armor\tutorial, we must enter meshes\armor\tutorial ⭐5C. Low/High Weight Output or Single Weight Output depends on whether or not you want the outfit to scale from weight 0 to 100 or not. Keep in mind that if the original outfit does not have the weight slider enabled, you have to enable it in the esp (explained in second post.) If you want to keep things as they are then just look at your starting files. If you had a _0.nif and a _1.nif then the outfit has a weight slider and you should leave Low/High Weight Output ticked on. If it only had one .nif file, then it won't have a weight slider and you can change it to Single Weight Output (assuming you don't want to enable the slider.) ⭐6C. Look at the bottom for the checkbox which says Copy reference shape into output. You need to decide whether or not you need the reference shape to be part of the final outfit or not. In most cases you will want to leave this checked. If you are refitting an armor which would completely cover the body then you don't need a body included into your refit and you can uncheck this. Part D : Exporting the project ⭐1D. Now save the project, and close Outfit Studio. Open BodySlide and look for your project that you just saved in the Outfit / Body menu (the same menu we started with.) You might have to close and reopen BodySlide to get your new outfit to show up on the list. ? You will probably notice that some of the sliders might have disappeared. It's fine. If we deleted the genitals, then all the sliders for the genitals would have gone away. If we didn't delete them, you will still see the sliders for them there. It's normal. ⭐2D. Select your outfit, and in the lower left window of BodySlide check the box next to Build Morphs. If your armor has Low/High weight enabled, then you must increase the slider "Weight 1 to 0" under Low Weight to 100%. ⭐3D. Hit the "Build" button. ⭐4D. Bodyslide will export the files to your skyrim data folder (or wherever your output location is set to.) It will build the .nif files and also a .tri file. You need all of these files to go to the location where you have the original outfit, overwriting them. Make a backup just incase. Now you should be able to get into the game and enjoy your work. In the second post, there are some additional methods which might prove useful once you have gotten used to the basics of the main tutorial.
-
33 pointsAdditional Techniques I didn't want to make the guide longer and more confusing by adding in every little thing you can do differently in between the important steps. The main part of the guide has everything you need to complete a basic refit from start to finish. This section will have some extra tips which will complicate the process, but allow you to make better refits. After you're comfortable with the general process, you can try some of the techniques here. Copying the physics of the HDT body to the armor ⭐ If you used the HDT body for your refit, you probably also want the armor you refitted to move the same way that the body does, otherwise the body will clip through the armor when it's bouncing. SAMBody needs to be the reference for you to do this. You should be able to do it at any point before you save your project. First of all, you need to be using the HDT body in your refit (So you selected either SAM Normal HDT or SAM High Poly HDT. Use CTRL+ Click to select all the shapes of your outfit except any SAM body parts. Do not select the body, genitals, hands, feet, anything like that. Navigate to the "Bones" tab, and use CTRL + Click to select: NPC Belly, NPC L Breast NPC L Butt NPC L Front Thigh NPC L Rear Thigh NPC R Breast NPC R Butt NPC R Front Thigh NPC R Rear Thigh With everything selected, click on Shape> Copy Selected Weights and press OK. Now you can continue on with the guide as normal. Deleting Parts of the body (or outfit) mesh ⭐ When a large part of the body is going to be hidden underneath an armor, you might want to just delete that part of the body instead of trying to fix the mesh over it. It will make a cleaner and better-looking refit. If you are familiar with Zap sliders, you can also use that instead, but I'm not familiar with it so I won't talk about it. ⚠️ Notice: This is something that has to be done at a particular time in the process, otherwise it will mess everything up. If you're going to do this, then I would do it right after step 3B the step after you conform the selected shapes. You will then need to unset SAMBody as a reference by right clicking it and pressing Set Reference again so that it isn't Green anymore. Do not delete any vertices from SAMBody while it is still the reference shape (Green) Now, to delete parts of the mesh, Find the Mask Vertices tool at the top of Outfit Studio There are some situations where you might also need to deactivate the Mirror Edit tool (for example, in an asymmetrical armor where the left arm will be showing so you only want to remove the right arm) You may also find the Vertex Edit mode useful. Expand the brush settings because you will probably need to use them for this. Adjust them while you work. With SAMBody selected, Mask the parts of the body which are covered by the armor or clothing. It helps to put the clothing in wireframe mode first (click the eyeball next to its shape name) Alt+Clicking will undo the mask in the area you click, incase you mask too much. Press CTRL + I to invert the mask. Then right click on the SAMBody shape name and Delete Vertices. If you need to delete more, you can repeat this process. If you took too much away then unfortunately you have to start over from scratch. So be careful. Continue with the guide as normal, except whenever I mention a reference shape, you simply won't have one any longer. You can do this process with the armor/clothing itself as well if there are parts you want to remove. The timing of when you decide to do it becomes more flexible in that case and you can do it whenever you feel like. Enabling the Weight Slider when it's disabled ⭐ Sometimes you'll want to refit something that doesn't have a weight slider enabled. You'll know because it'll only have one mesh to work with rather than both a _0 and a _1. You're not required to add one, but since we can make the _0.nif so easily following this method, you might feel like enabling the weight slider. For this you need TES5Edit or SSEEdit depending on whether your esp is for LE or SE, of course. You can also use the Creation Kit but I try to avoid opening the creation kit whenever I don't have to. Expand your armor's .esp in TES5Edit/SSEEdit. Look for the Armor Addon section. Find the armor you're trying to refit. Once you have it selected, look in the right window for "Weight slider- Male". Double click the blank space next to it slowly, and a drop down box will appear. Select the checkbox next to "Enabled" ⭐ After that, you need to check the name of the Male world model Check the Male world model to see what the name of the file is. If it doesn't end with _1 you need to add it in. If it was already using _1 then you can leave it, it's fine. Exit and save the changes to the .esp (Make sure to have a backup.) Keep in mind that once you enable the weight slider, your refit needs to have a _1 and _0 mesh for it to work.
-
26 pointsThis is a conversion of El Men's Underwear: http://www.nexusmods.com/skyrim/mods/80618/? by Elza to the SAM body. I did not include the textures, so you must download and install the original mod to use this. Download one of the two "equip versions" of the mod. Either 1k or 2k textures, and then install my mod over the top of it. The included esp changes the equip slot of the underwear to use slot 52. In addition, I changed all of the names of the underwear from numbers to what the description of the design is, so you know which ones are which. To obtain these either use an additem code, or buy them from Radiant Raiment. Credits: Elza (aulie) for the original mod, VectorPlexus for SAM. SAM - El Men's Underwear Equip.7z
-
26 pointsTrying a new style. It's a lot more time consuming but adds some interesting visual flair. Only 4 pages so far. I'm having fun just making it but let me know what you think and if you want me to share more.
-
26 pointsIm'ma need some help over here and I post here since I think people visit this thread more often than any other place or subforum I'm gonna go through all of my refits and going to unify all of the underwears for all of my refits coz I'm too lazy to weight paint them over and over again 😂 Respond with 💚 for the green underwear, and 🔥 for the purple underwear.
-
25 pointsHaving a little too much fun with my chubby pirate boy Drew. Moar pirate filth:
-
23 pointsI've been noticing a few people having issues with their SAM installation so I've finally gotten around to writing a quick tutorial for you guys. First off you will need: SKSE SkyUI Realistic Ragdolls & Force (Needed for RaceMenu 3.4.5 & SAM-based physics mods) HDT Physics Extensions (For RaceMenu 3.4.5 & physics) RaceMenu (Use the older v3-3-0 if you don't want to install the HDT stuff) SAM Core SAM Textures (SD, HD or 3rd Party) SAM Vanilla Skyrim Refits XP32 Maximum Skeleton Extended (For RaceMenu 3.4.5 & physics, overwrite SAM's skeleton) Soft requirement: The Unofficial Patch (currently USLEEP) And optional but really tasty: Modular/Skimpy Armours (Install after / on top of the Vanilla Refits since these only change the body armour) Once you've got all the files install them manually (not recommended) or with your favourite mod manager (Nexus Mod Manager or Mod Organizer). Once you've got that your load order should look something like this. The screenshot from Mod Organizer so my mod list is on the left and load order on the right. USLEEP, Bug Fixes, Crash Fixes & OneTweak are stability/performance mods I also use, Alternate Start skips the intro cutscene before character creation and gives you different starting options and RaceMenu adds extra character customisation options. The Unofficial Patch & Alternate Start mods are not required, but you'll see a neck gap on some clothes if you don't install USKP/USLEEP. Below are pics of the Wolf Armour in Normal, Skimpy and Nude (With schlongs disabled in the MCM menu) And if all goes well hopefully you'll be able to enjoy the (much improved) male population of Skyrim a little more. UPD.: In order to fix neck gap on some clothes, move USLEEP below SAM armor refit mods.
-
23 pointsMy big, blonde boy Brutus
-
23 pointsKrom & Garret go down to the lake to have some midnight fun Adult content, sexual animations, etc.
-
22 pointsMy big, bronze, beefcake; Obright.
-
22 points
-
22 pointsI was cleaning out some old folders and I saw that I never uploaded this story here, only on the Nexus. So apologies if you've already seen it Goran and his buddy Rein settle some some gambling debts 🤑 (nudity, sexual gifs, and so on)
-
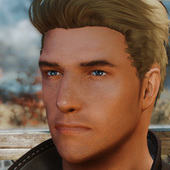
22 pointsOh captain, my captain. It took me an embarrassingly long time to realize that 3DS Max has a tool to conform one object into another, essentially allowing me to shrinkwrap my high poly head mesh over Cap's head shape without having to learn Blender. Yes, I've been playing a lot of Marvel's Avengers lately.
-
21 pointsHad a bit too much fun with this one More:
-
20 pointsJust a brief intro about the site and me, for those who don't know me or my work. I've been modding games for years, specifically because I could never quite find mods that would cater to my specific... tastes. It all began about when Sims 1 was released, and basically I wanted to have bigger and beefier men in my games... Sims 2, Oblivion and finally Sims 3. I never published anything back then because, I prefer to keep a low profile, and I'm always a bit to shy when showing what I do to others. When I was modding Sims 3, I got really fed up with it though. Sims iterations seem to cripple more and more the way I wanted to mod my men, not to mention that I would literally spend hours just launching up the game/neighbourhood, just to look at how something would look like in game, just to see that my guys would start suffering from Parkinson, just because I wanted them to have bigger arms/hands. I remember once, I think I waited 30 fucking long minutes, and that was the last straw... I shelved Sims and I'm done with it... Thats when I started to look for another game to play/mod, and discovered Skyrim. And I know that this will shock many ppl but... I hated Oblivion! So naturally Skyrim, was a nice surprise. And I decided for the first time to go out of my confort zone (I have severe social anxiety and I don't feel confortable around strangers or crowds), and actually release mods for it. First one it was of course, the (in)famous SOS - Schlongs of Skyrim, which got a whole lot more attention than what I expected or was prepared to. Later on I ended up abandoning it, due to several reasons, and I later developed SAM - Shape Atlas for Men, which was a more refined SOS version, with more features, and also more male centered. Not because I'm against boobs or vaginas, but because there are already so many people developing mods for that, I wanted to create something that would mostly cater to gay men and straight women alike. Up until about 1-2 years ago I made Hall of Torque my "home", but some very unfortunate sequence of events left me to abandon that community, and so now, here I am, with my own website (which was only possible due to support from my Patrons), and ready to start releasing again my very unique work, and to build a community around it, where people can feel welcome without having to go through the harassment of using other mainstream sites. Not that the administration of those sites are promoting in anyway an homophobic agenda, but there is little they can do against a rather loud and angry mob of homophobes that exists in their community. This last period I was gone, I kept on modding, its something I really enjoy, it distracts me from... bad ideas. The only reason why I wasn't publishing/releasing was because I was unconfortable to do so again. So, while I'm very happy and thrilled to have my own website, where I will be able to share my work again, in essence, this is for you guys. For all of you that enjoy my work, to give you a space free of harassment and judgement from others. I hope you guys enjoy your stay! Vector
-
20 pointsI've finally gotten Proteus and now I've given Captain Aldis a makeover and forced him to follow me on some naked adventures
-
20 pointsI haven't forgotten about forrest and he hasn't forgotten about you either. He really wants to play. Very adult content ahead, animations etc.
-
20 pointsThis was going to be something more but Skyrim was on a crashing spree and it's too hot, so I gave up. It was supposed to be a POV thing in which your friend Forrest moves in with you but whatever Maybe the crashes were a sign it was a boring idea
-
20 pointsSAM Light Bara skin and normal map. Face and body. Enhanced with Pink asshole XD.
-
20 pointsThis is just a re-upload of my refit of Ashara's Princes of the Woods found here: http://www.nexusmods.com/skyrim/mods/18008/?. I think that speaks for itself without the need of a fancy banner and so on. You must have SydneyB's original mod installed first, and then install my files over the top of them. For MO just make sure my files load after. Credits go to SydneyB for the original mod, and Vector for SAM. I simply did the refit, nothing fancy. SAM - Ashara Prince of the Woods Optionals.7z SAM - Ashara Prince of the Woods.7z
-
19 pointsA few of my fellas. They don't really fit in with the cute guys around here but I like 'em rugged. Reynard: Maxwell: Jørgen:
-
19 pointsA few random shots of Zalthu, a new Orc character of mine, not quite final yet. Once again been fiddling with my load order and adjusting ini/enb settings my framerate doesn't approve off, still need to fix a few kinks between the character mods I have installed. Better ones of him will come soon.
-
19 pointsAsbjorn needs a little help reaching his back. Anyone?
-
19 points
-
19 pointswhat a, uh, strapping young man
-
19 pointsSAM BARA SLIDER EXPERIMENT Adjustable bigger or smaller : Triceps Biceps Sixpack Front thigh Back thigh Inner thigh Ass Shoulder Waist Wings ( muscle between upper arm and upperbody near armpit ) The goal is to make true bodybuilder body. Not just big scale. As gym fan myself, i need gym sexy body for my males not just big like fat daddy. Even with XP32 slider from racemenu, that slider not good. If we adjust biceps...whole upper arms become bigger ( Fake biceps setting ). Now this slider can adjust Triceps too. Full BUBBLE BUTT and muscular back thigh. Muscular Leg Overall my goal to make sam body like true mighty man. Still need work on Forearms. Maybe if this finish i can post OBJECT slider 1 or 2 so you don't need adjust every part like mad man. More like Samuel or Samson slider type with different shape.
-
19 pointsThe five stages of body hair, from smooth as a 🐬to hairy as a 🐺. I love 'em all equally
-
19 points
-
19 pointsAfter countless tweaking and starting from scratch, I finally got my skin textures looking the way I want them. I redid the ears, face, clavicles, neck muscles, and all skin pores. The rosy cheeks might make certain skin tones look like clowns (SPN taught me that we're all clowns 🤡).
-
19 pointsBetter i repost it here because we can't reply there. Finally that thread full XD.
-
19 pointsUncle John is first pic for new thread XD.
-
18 pointsA few more of my big guys Charlie: Even without clothes he's still very dapper: Daryl and Jansen getting in trouble at the Mages College. Not sure how Daryl ended up naked but the Arch Mage was not impressed: Jansen doing his best to hide behind Daryl: A big older beefcake called Turgan: Big hung daddy:
-
18 pointsThe direwolf suit,Sexy and agile,Modular retrofit with integration in one esp,Three physical components。
-
18 pointsJust finished painting this , I named this underwear model " Fabulous " . It will come with 6 textures variant , I am only showing Gold and Gray here . The gold version is a little special . It is going to use my exclusive Supernova Cubemap for all that glittery and shiny goodness P/S : Watch out for the large image size , screenshots are in full 4k because I want to show you every bit of details 😚
-
18 pointsI squeezed an Elephant into a box ! I have transformed variety of men's hairstyles ( viking , goth , pirates , moderns etc ) with over 2 millions polygons , into just 200k + - ! Which means these hairs can now be used in Skyrim ! These hairstyles are made for professional studio and AAA project . As you see from the screenshots , they are amazing for close up-screenarcher where each strand of hair can be seen in extreme details . This is a massive project which I've dumped a lot of money and time into it . It will probably take many months to fully release them but none of us want to wait that long , right ? So these hairs will release in episodic format and our friends on Vectorplexis will get 2 more extra hairstyles each time I release / update the mod . The bad news is , you will likely need at least a RTX 2060 GPU to run these hairpack . I can't wait to see what these hairstyle will look like on your favorite char !
-
18 points
-
18 points
-
18 pointsHope you like bears 🐻 because Charlie needs some love:
-
18 pointsJust a little preview of a story I'm working on. It will be finshed soon-ish
-
18 pointsAfter 5 years of modding, I finally had the idea to throw together a Lion-King-themed Khajiit 🦁
-
18 pointsBeen a long time since I made a SAM outfit Feel like I'm enjoying skyrim again here are some shots I liked 😋
-
18 pointsThere you go. I release this body map in download section. Enjoy then. Le Se compatible.
-
17 pointsSOS V2 This is the importance of learning from games that are more modern and sophisticated in terms of graphics. A few days of trying out new games like Jedi survivor and Dead island, seeing how they render and render characters....the characters in Skyrim feel so outdated. SOS V2 is updated with a new specular as well and a few changes to the subsurface map. Now his body has the sensation of "rendered" and not just dead polygons from old games. Silky skin but feels thick and supple. SOS V2 is ready to be paired with the currently popular RTGI because it is also customized. The genitals and special pink holes are done too. Now only final testing and packing are more practical. SOS V2 will be divided into several segments for the skin. The default pack will use the Default SAM skin mixed with the best skins. Other skins will be available as optional such as Caucasian which is more reddish or semi redguard brown skin for rougher characters. Of course complete with new muscles. The screenshoot uses RTGI to show the best results and default SAM Muscles. The skin above is the base skin (Smooth). Adding hair is easy but the Basic Skin has to be correct first. Never make skin and cover defects with body hair. Make sure the base skin is good first.
-
17 pointssometimes even the executioner needs a vacation 😩
-
17 pointsMaxwell and his little buddy Rein playing risky games in a back alley: Big springy dick is ready to play:
-
17 pointsMy little cute fella, Declan
-
17 pointsThis particular lighting in the vampire castle really makes my skin textures pop.
-
17 pointsJust for fun. Combining Kreis dwemer with my Clockwork City ESO style.
-
17 pointsI did this months ago, and the quality of the fit is arguable because I don't really care about minor clipping on my end (laziness). I don't feel like doing a proper upload at the moment either. So here you go: https://drive.google.com/file/d/0B7dGPzUDGYmISEVRUlhueEFkXzQ/view?usp=sharing credits go to Dizona for making the armor, and by extension in their credits, DAZ3D for the textures. Vector for SAM naturally.


