

Description
A quick fundamental guide to add items into leveled lists via script. This article will only cover how to add some simple apparel items in a leveled list into basegame leveled lists. "Simple" means that the item doesn't have any modification options other than legendary slot and railroad weave option, otherwise it requires some knowledge about "Object Template" and "Initialisation Filter" keyword.
For weapons, consumables or other items, the basic procedure is similar but there tend to be some minor differences in details.
Leveled List Injection v.s. Leveled List Direct Edit
Pros: Highly compatible. Through leveled list injection, we don't bother to resolve conflicts and there is no necessity to build a merged patch file everytime we add a new leveled list mod.
Cons: "Irreversible" and "Intangible". It is a bit difficult (and not recommended) to reverse the leveled list injection unless you reload a save before leveled list injection executes or restart a new playthrough completely. Besides, the leveled list injection can be a bit messy if there is a lot, because we are not well aware of the final contents of each leveled list.
Therefore, it totally depends on your preference to use leveled list injection or leveled list direct edit.
Tools
- FO4Edit
- An injection script installed. You can use mine (which I will use as an example in this article), or any other scripts you might find on Nexus.
- The mod you want to inject installed. Here I will use NCR Outfit Pack as an example because these outfits are suitable as "Simple" items.
- Optional: An injection template esp plugin. I have created one and I will use it in this article as well. But this is not necessary, just for the sake of convenience. Make sure that only active this template plugin in FO4Edit instead of your load order, so it will not load into your game.
- Optional: You can check my article about leveled list cheatsheet. Therefore you can quickly grab the leveled lists you want to use.
- Optional: FO4Edit script to quickly add items into leveled list.
Prerequisite
Some basic knowledge about "Leveled Item": Link.
Steps
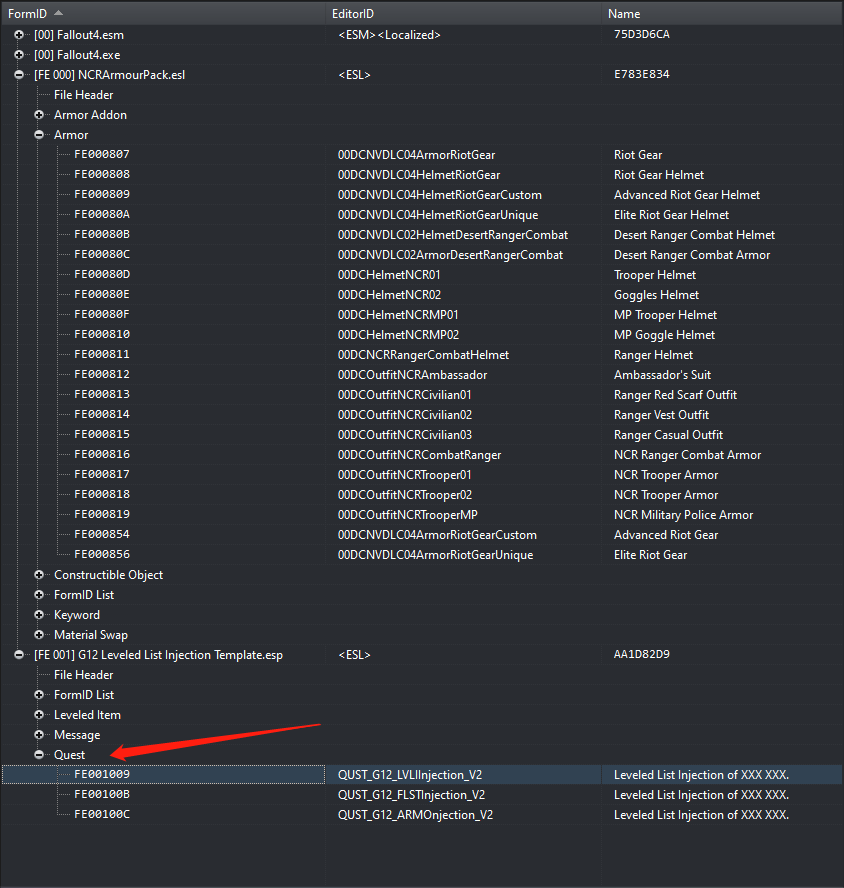
1. Open NCRArmourPack.esl and Leveled List Injection Template.esp in FO4Edit.
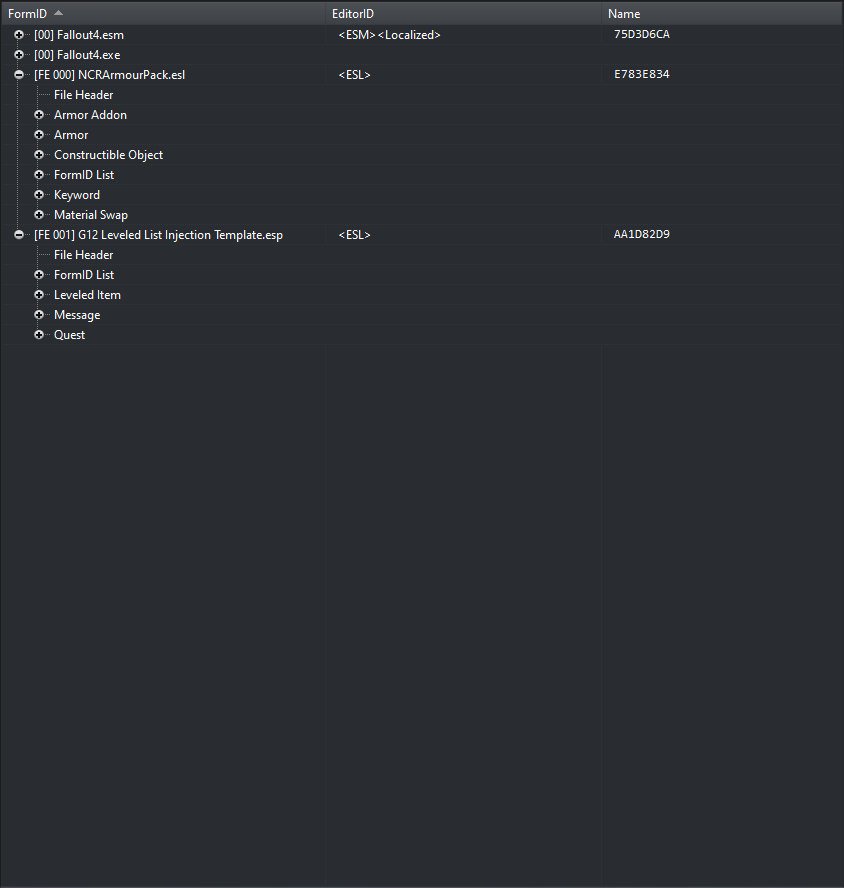
2. Determine the outfit(s) you want to inject. Here I want to inject these three "Ranger Outfits" into leveled lists of Wastelander & Scavenger and Settler.
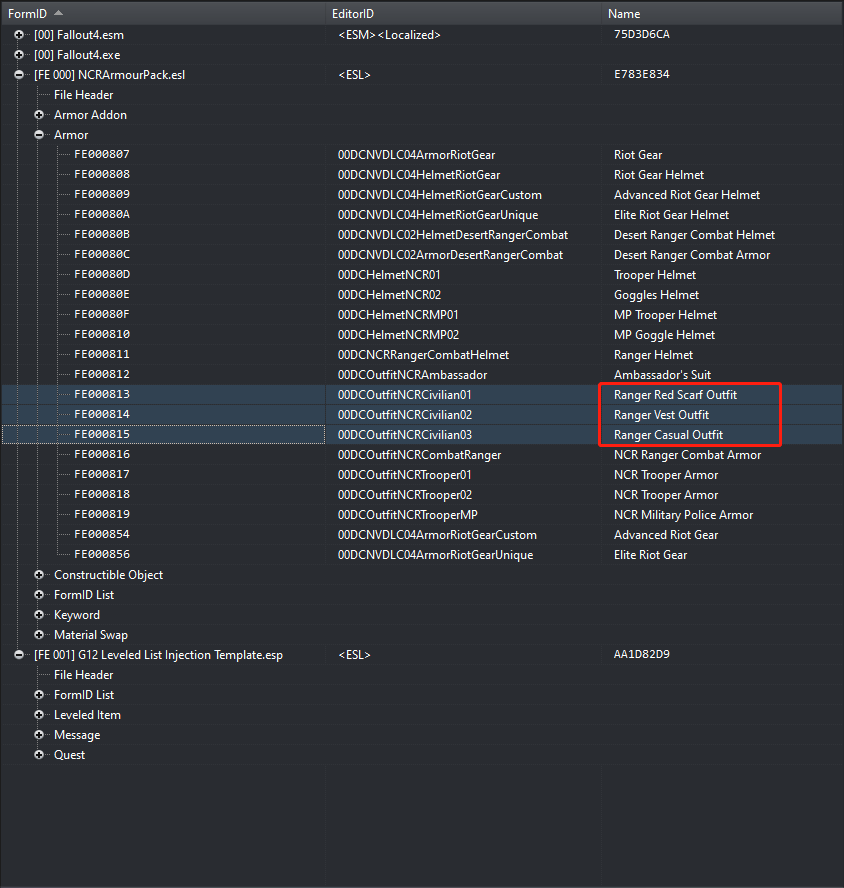
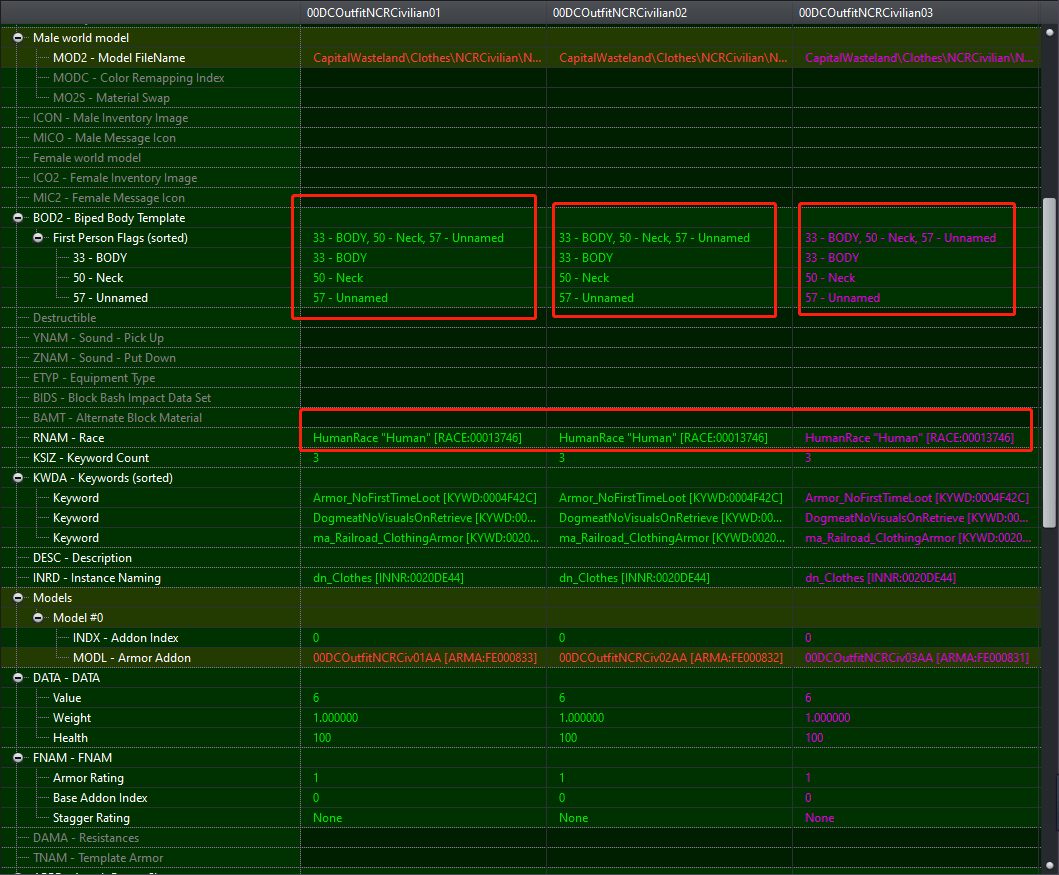
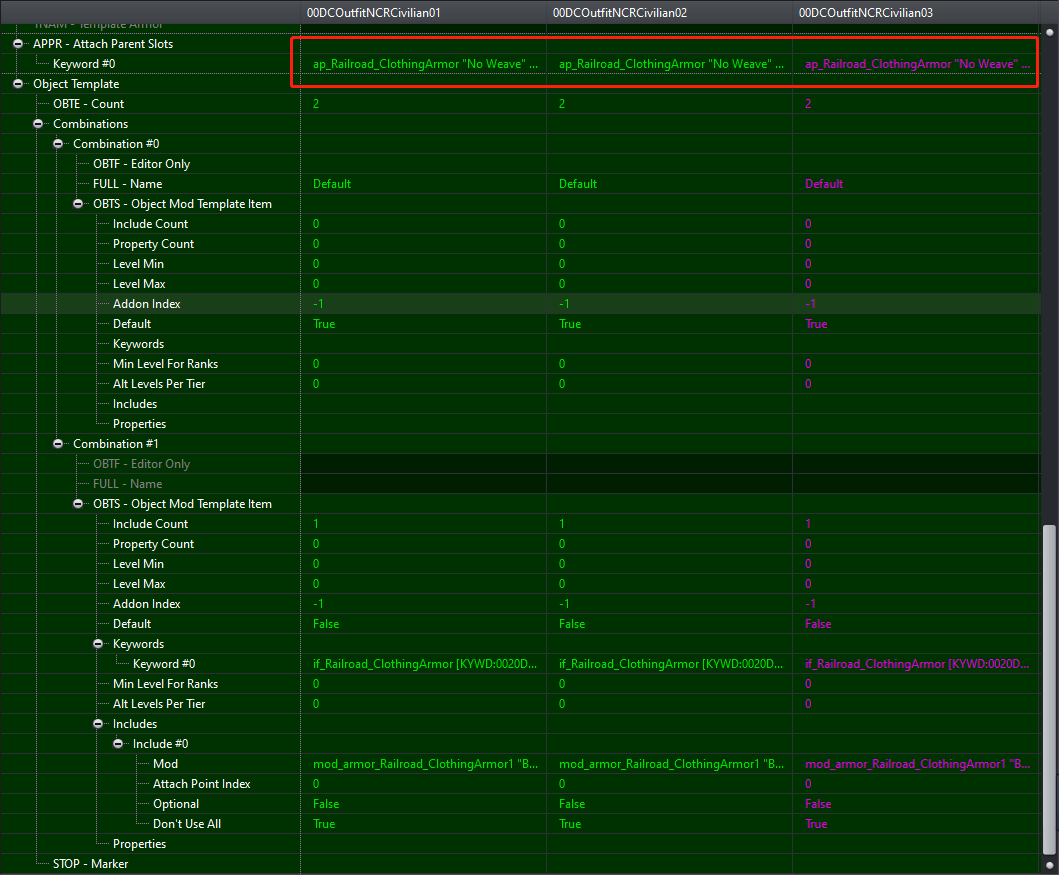
3. We must check their supported races, biped slots usage and object template (Or simply by referring to ites attach parent slots).
In this case, all these three outfits use [33][50][57] slot. [33] slot is mandatory for an outfit, while [50] slot might have conflicts with some accessories or headwears but should be fine in most cases, and those "Unnamed" slots we can simply ignore them. These outfits don't have any of [41][42][43][44][45] slot(s), so that they can also be injected into some underarmor leveled lists and hence spawn with some random armor pieces.
All these three outfits support Human race.
All these three outfits are "Simple" ones, due to only one attach parent slot "Railroad Weave".
4. Since that we have decided our items to inject as well as check if they are suitable to inject, now go to my template esp file and expand "Quest" entry.
5. Right click on the first form with EditorID "QUST_G12_LVLIInjection_V2" and select "Copy as a new record into ...".
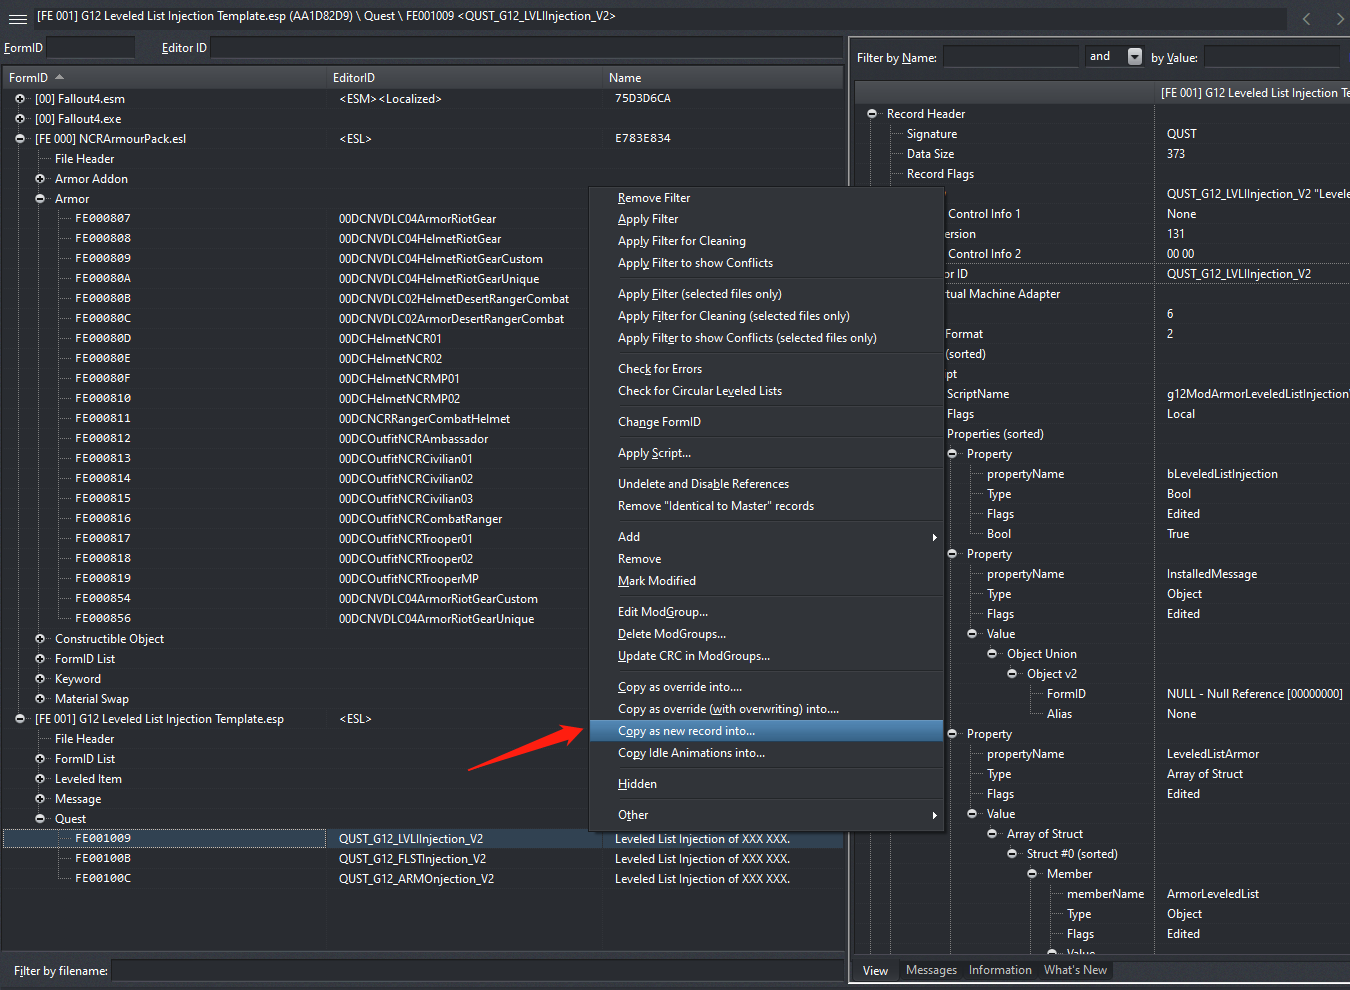
6. Enter a new EditorID as you prefer but make sure it is quite "unique" so we will not have duplicated EditorIDs (but it should be fine anyway).

7. Click "OK" and then select the same option as the one in the image below. Therefore we will create a new esl-flagged esp file which manages our injection.

8. Give the new esp a name as you prefer. Try to give it a quite "Unique" name otherwise one of the esps with the same name will overwrite the other one.

9. Expand our new esp and expand "Quest" entry. On the right panel, only the fields pointed by the red arrow are modifiable. The other fields must be left intact otherwise the script will fail to execute.
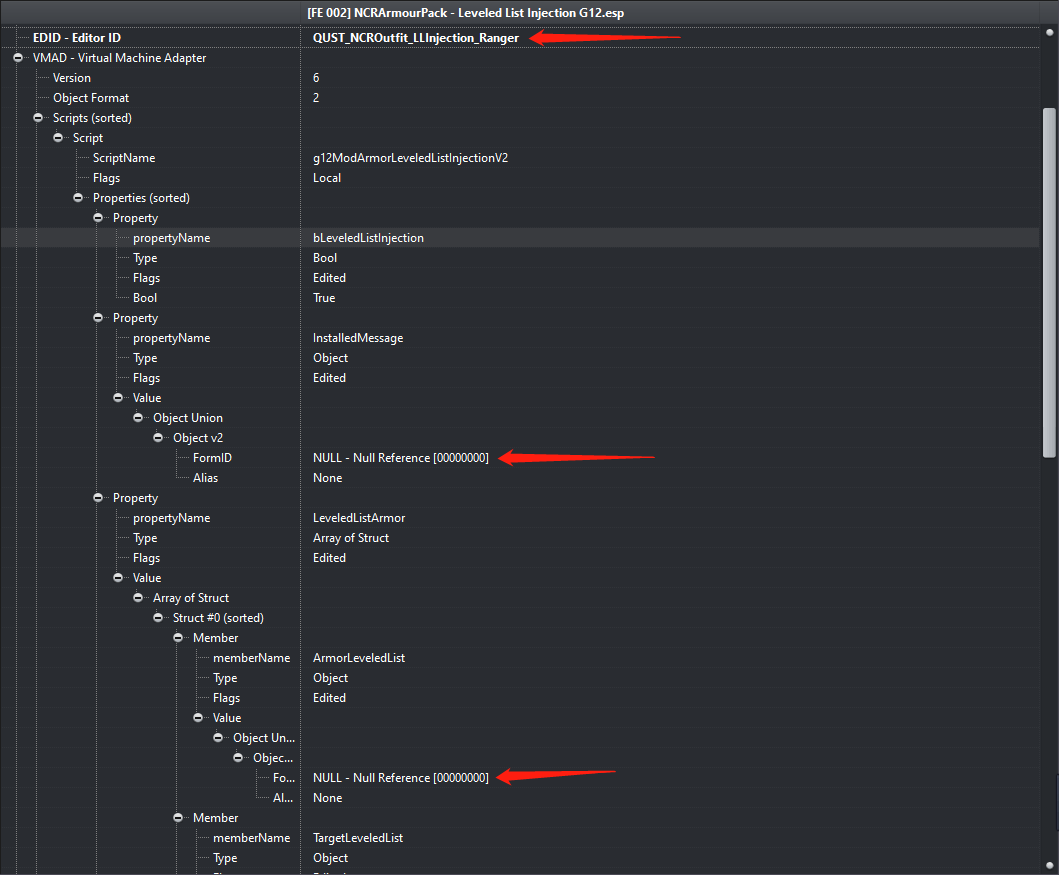
10. First let us modify the "String" field of propertyName "ModName", and "FULL - Name" field. These two fields are arbitrary and you can also leave them empty or intact. They just work as a reminder.

11. You might also want to add a "Message" to pop up in game when the leveled list injection has successfully executed. You can skip this step and jump to 15. if you don't want any message popup in game from your injection.
12. Go back to my template esp file and expand "Message" entry. Right click the message form with EditorID "MESG_G12_Outfit" and select "Copy as a new record into...". Give it a new unique name and then in the next popup menu select the new esp we have created. Now you should have the same result as in the image below.

13. Now we need to write the message we want to see in game. Left click the newly created "Message" form in our injection esp file. On the right panel, enter the text as you prefer in both "Description" and "FULL - Name" fields. This will be the message popping up in game. For other fields such as "TNAM - Display Time" you can modify as you prefer.

14. Now we need to assign our message form into our quest form. Left click our quest form and on the right panel, type the form "fe002002" or the EditorID of your message form in the field "FormID" under "InstalledMessage" propertyName. Now we have finished the message part.

15. Now we will start the essential part of our leveled list injection. Since this article will only cover how to inject "Leveled Item" into "Leveled Item" (the most frequently used one), we need to create a "Leveled Item" form. Right click the name of our injection esp file, select "Add" and on the right menu scroll down until you find "Leveled Item". Select it.
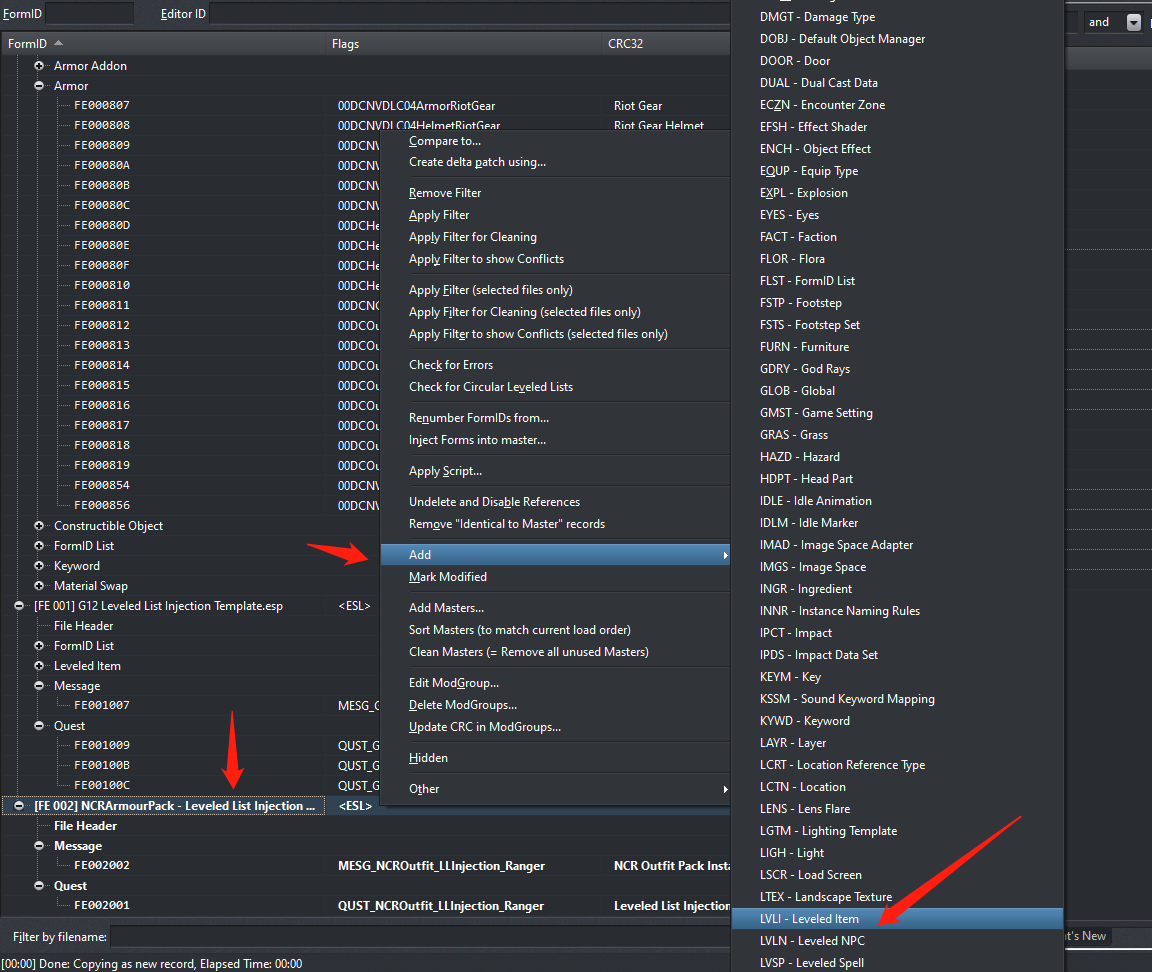
16. Now right click on "Leveled Item" entry, select "Add" and on the right menu select the only option "LVLI - Leveled Item". The popup asks you to enter a new FormID, but we can just keep it default and simply click OK.
17. Now we have created a new form under "Leveled Item" entry. Left click the new form and on the right panel, we should edit these fields first:
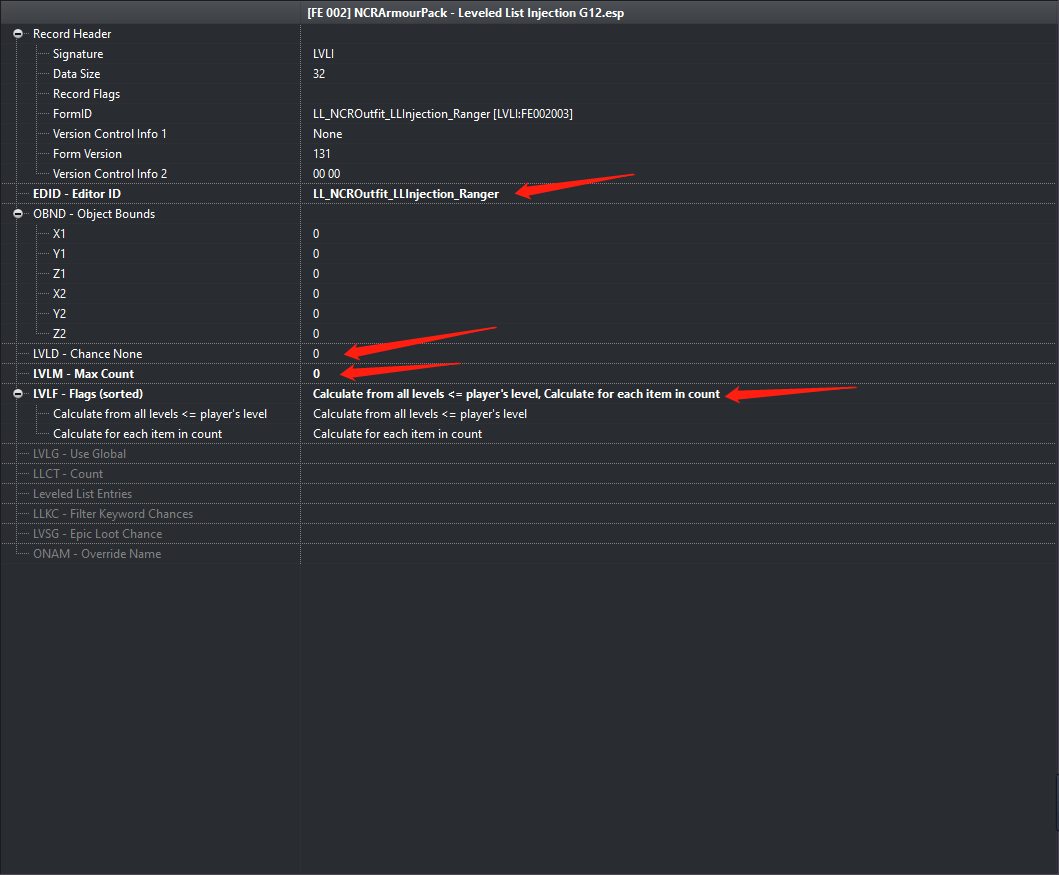
Set "EditorID" to a string as you want, better a unique one.
Set "Chance None" to 0. The field accepts a value between 0-100 and the value indicates the chance that this leveled list will output nothing. In our case, this field must be zero since we are adding outfits for NPCs and we don't want to see naked NPCs (Unless you do want to see naked NPCs).
Set "Max Count" to 0. This field is mainly used by containers, loots and vendors as a non-zero value. For apparels which will spawn on NPCs, this field can only be 0.
Set "Flags" the same as the image below. The flag "Calculate from all levels <= player's level" means that all the items in this leveled list will be considered once its given level has been reached. For example, if without this flag, the item with lower level will stop spawning once the actors reach the higher level of another item in this leveled list. "Calculate for each item in count" this flag doesn't do things for apparels of NPCs, but it is a good practice to add this flag since we might want to inject this leveled list for containers, loots or others which will utilize this flag.
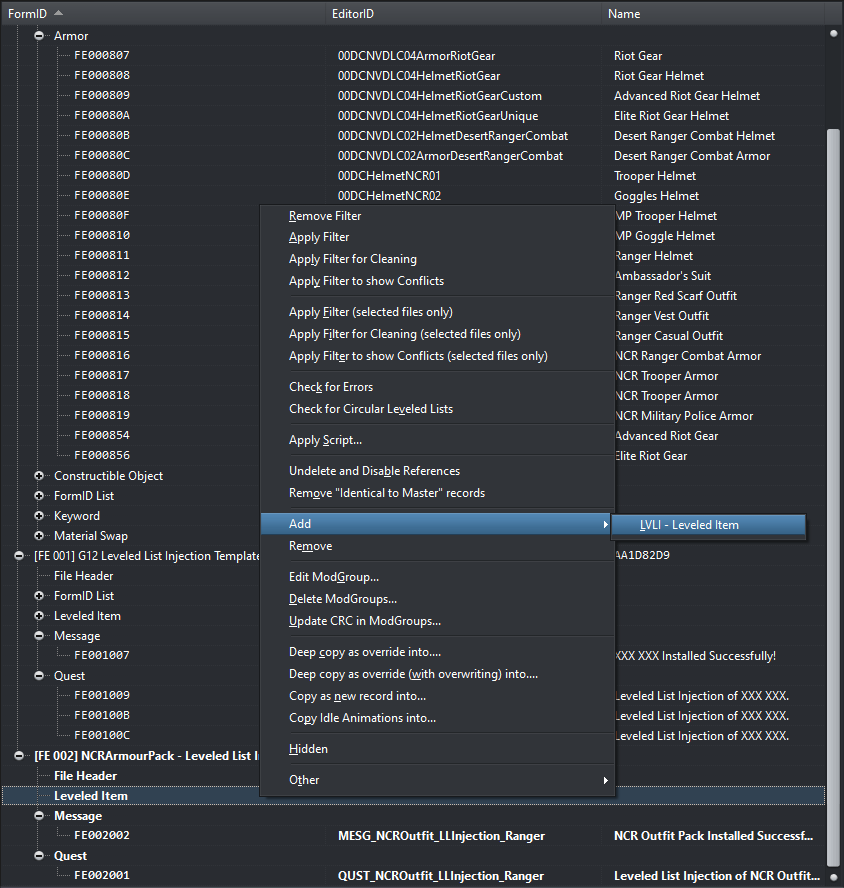
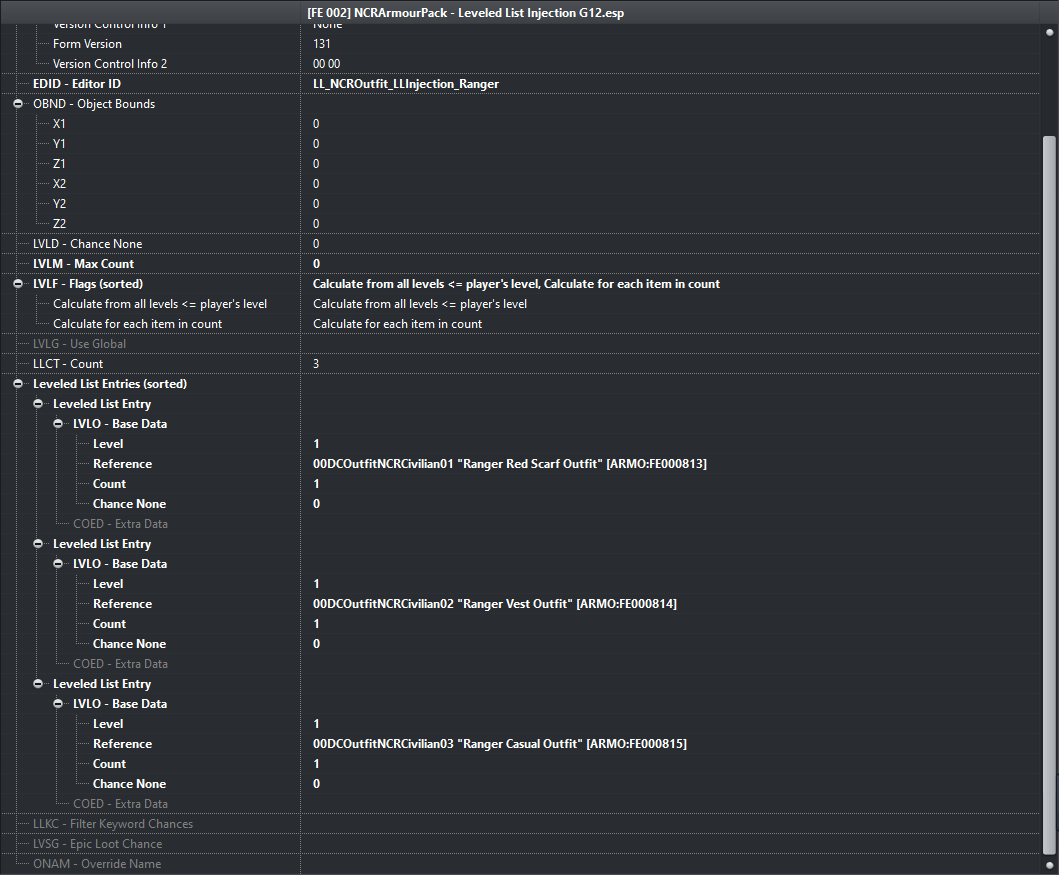
18. Now we want to add our 3 outfits into this leveled list. You can either use the script I have linked in the "Tools" part or mannually add them under "Leveled List Entries". But before adding items from another mod, we must add that mod as master for our injection esp. Right click the name of our injection esp, select "Add Master" and then select "NCRArmourPack.esl".
19. After adding the mod we want to inject as master, we can add our items into the leveled list. Right click "Leveled List Entries" on the right panel of our leveled item form, and select "Add". Fill these 3 fields "Level", "Reference" and "Count".
Set "Level" to 1 if you want this outfit to spawn from game start. Otherwise set another level as you prefer. But make sure there is at least one item with level set as 1 otherwise this leveled list might generate empty output.
Set "Reference" to the FormID of the item we want to inject from NCRArmourPack.esl. You can either enter FormID or EditorID.
Set "Count" to 1. This field can only be 1 if this leveled list is used for NPC apparels. For containers, vendors or loots, this field can be any non-zero value.
Keep "Chance None" as 0 by default. There is also "Chance None" field for each item in each leveled list form. But now we are injecting outfit, so the chance none can only be zero.
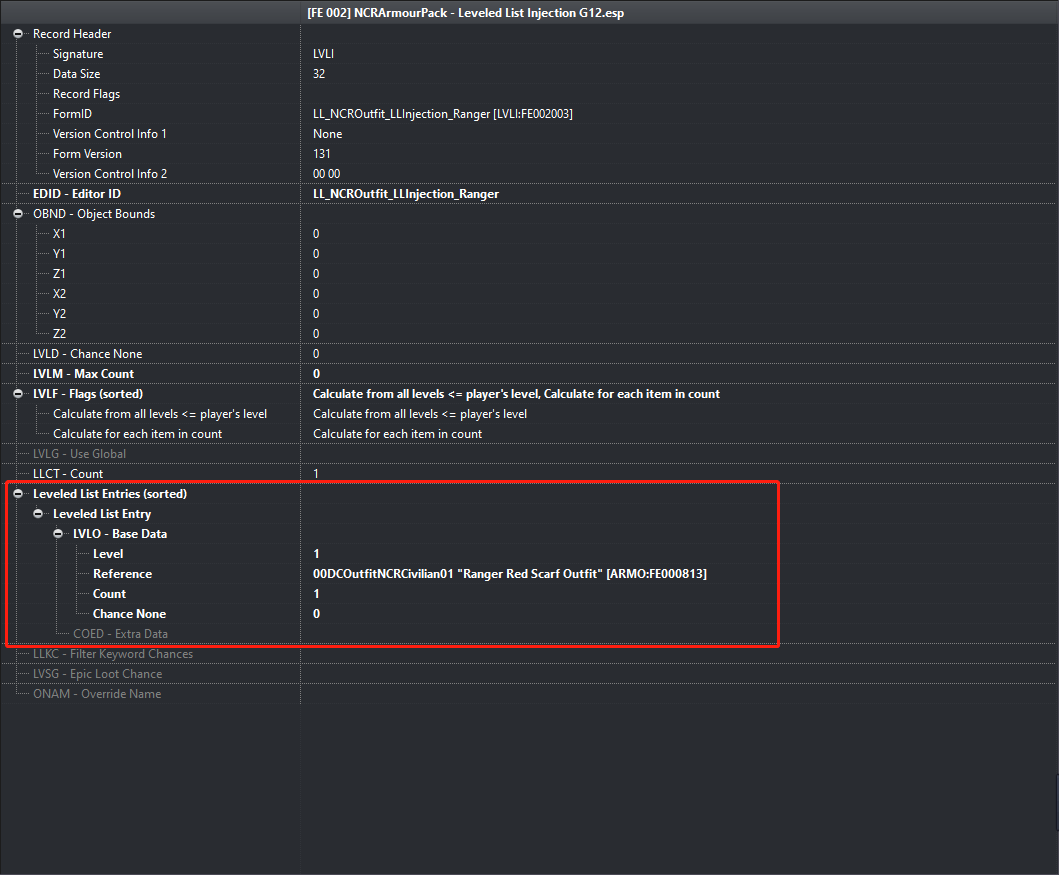
20. Now we add another two items and set the level as you prefer. So our final leveled list will be similar like this:
To summarize, in the example below, whenever this leveled list is used, it will randomly pick one item from these three entries. In other word, each item will have 33% chance to be selected as the output of our leveled list.
If you set the level of these three outfits to 1, 10, 20 for example, then if the actor has its level lower than 10, then this leveled list will only output the item with level 1. If the actor has its level between 10 and 20, the this leveled list will randomly select the item with level 1 or the one with level 10. But if you want that this leveled list follows the progression, such as only outputs the item with the highest possible value, then you should remove the flag "Calculate from all levels <= player's level", which means that after level 20, only the item with level 20 will spawn, while the other two will not spawn anymore.
If you want "Ranger Vest Outfit" has a higher spawn chance than the other two for example, you can add another entry under "Leveled List Entries" and set the "Reference" to "Ranger Vest Outfit" and the level and count to 1. By doing so, there are two "Ranger Vest Outfit" in this leveled list and when this leveled list is used, it will have 50% (2/4) chance to select "Ranger Vest Outfit" as output. Do note that you can't simply set the "Count" field to 2 since it will achieve the result in another way.
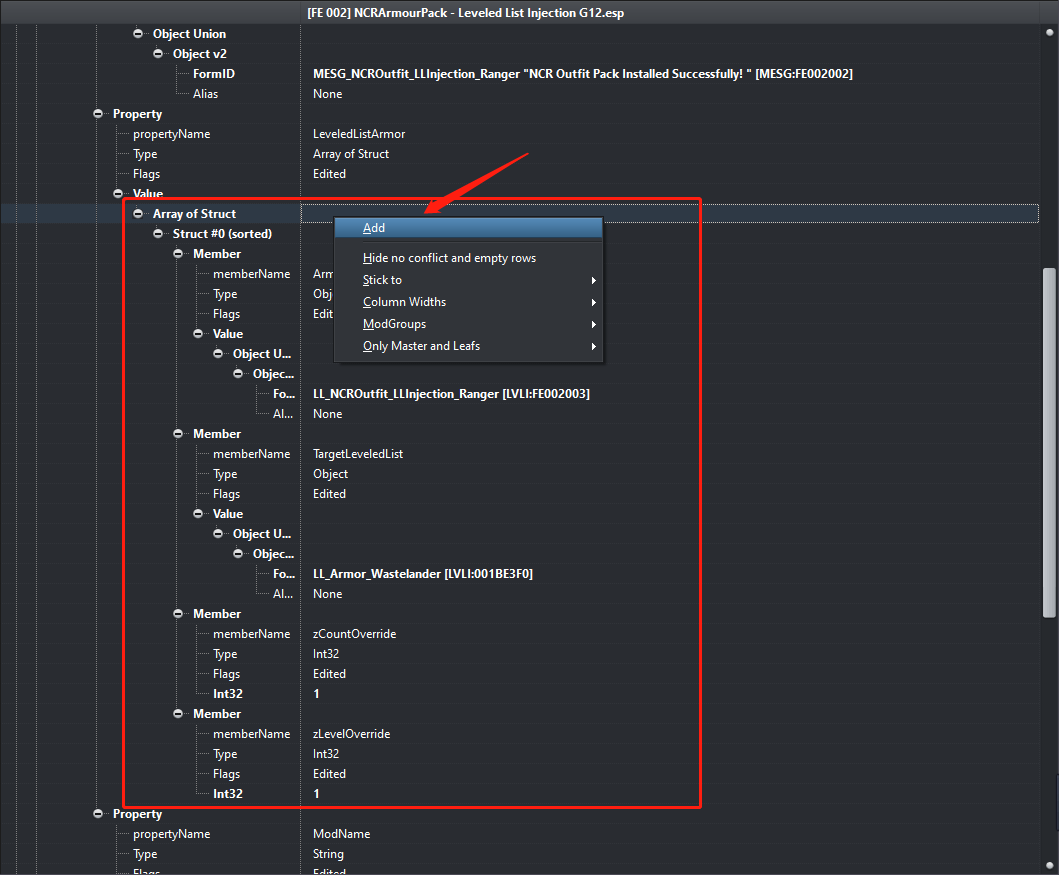
21. Now we have created our leveled list to inject. Go to our form under "Quest" entry. Left click it and go to "LeveledListArmor" propertyName.
The fields under this property determines how we inject our items. This property consists of at least one struct, and each struct will add one leveled list into a basegameone.
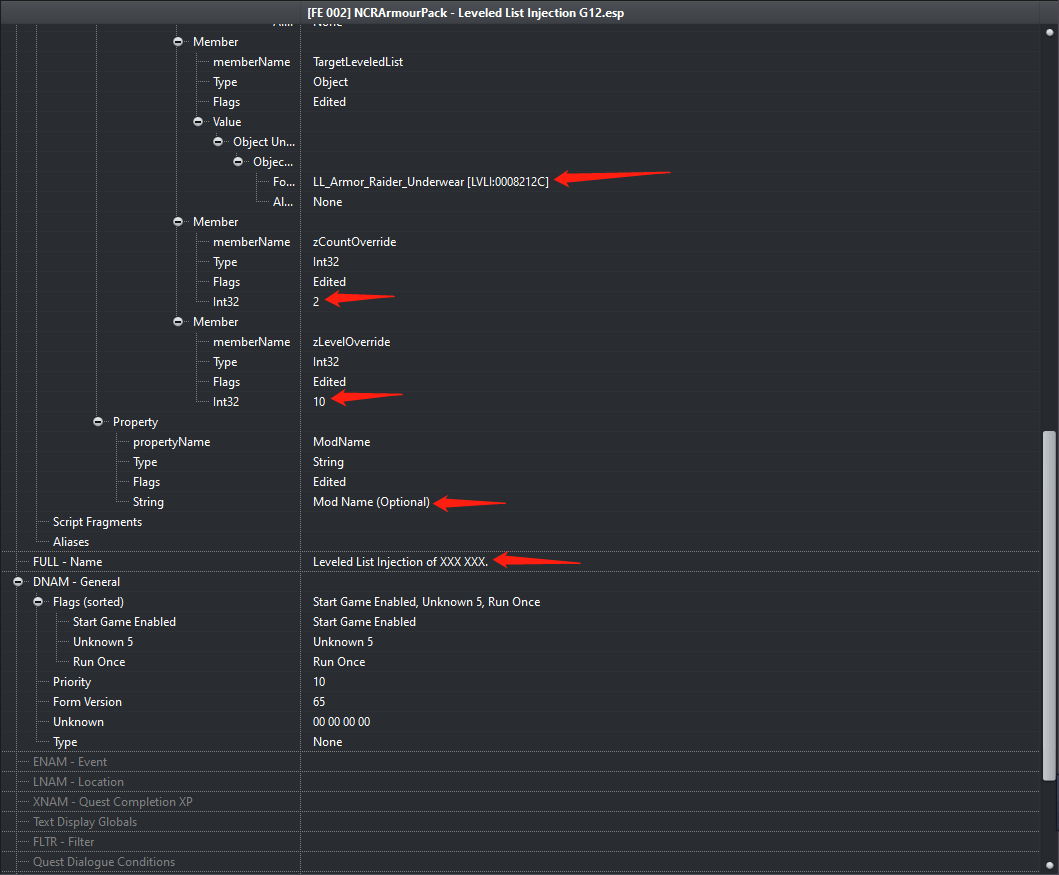
For each struct, there are 4 members, and the first two members "ArmorLeveledList" and "TargetLeveledList" are mandatory and can't be empty or "Null Reference". The "ArmorLeveledList" is our own leveled list, and "TargetLeveledList" is basegame leveled list, our injection target destination.
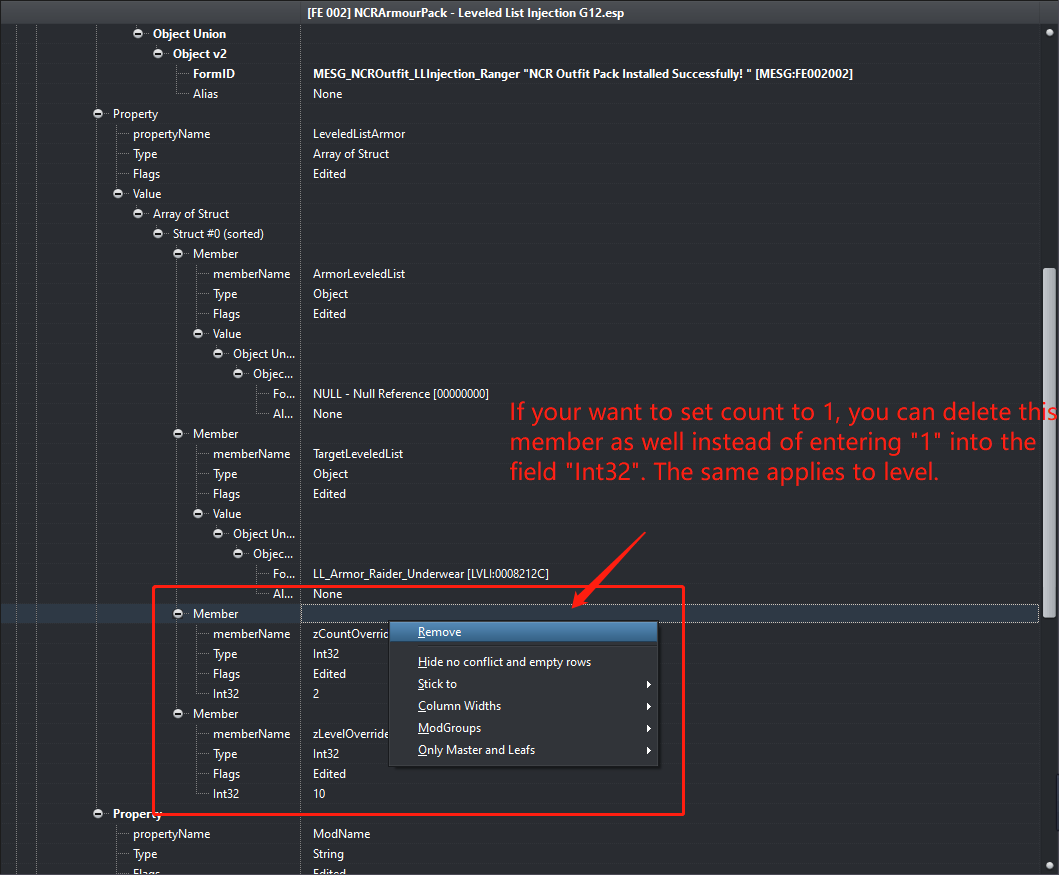
The last two members "zCountOverride" and "zLevelOverride" are optional (If they are equal to 0 or empty, they will be set to 1 by the script itself), and you can delete any or both of these two member by right clicking on the right side of "Member" if your level or count equal to 1. Do note that, the level here is the global level for our leveled list (Different from those ones we have set inside our leveled list). If you set this level to 10 for example, then our leveled list will not be used until the actor reaches level 10.
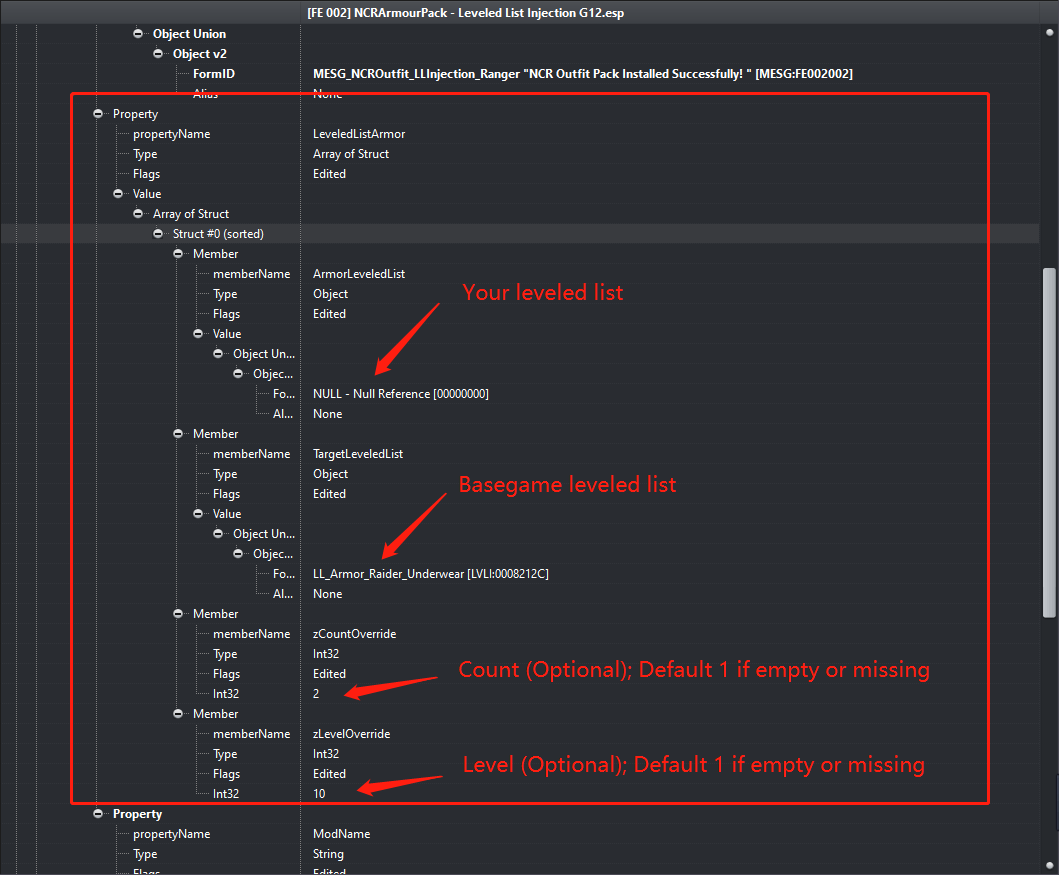
22. Now enter our leveled list FormID or EditorID in Form field under "ArmorLeveledList" memberName. Enter the target basegame leveled list FormID or EditorID in Form field under "TargetLeveledList" memberName. By referring to my article, we can inject into "LL_Armor_Wastelander [LVLI:001BE3F0]" or "LL_Clothes_Underarmor_Wastelander [LVLI:001BE3F1]" or "LL_Clothes_Wastelander [LVLI:001BE3ED]" or "LL_Clothes_Wastelander_No_Hat [LVLI:001C269D]". Here we enter "LL_Armor_Wastelander [LVLI:001BE3F0]" into the Form field under "TargetLeveledList". Set count and level to 1 or delete these two members.
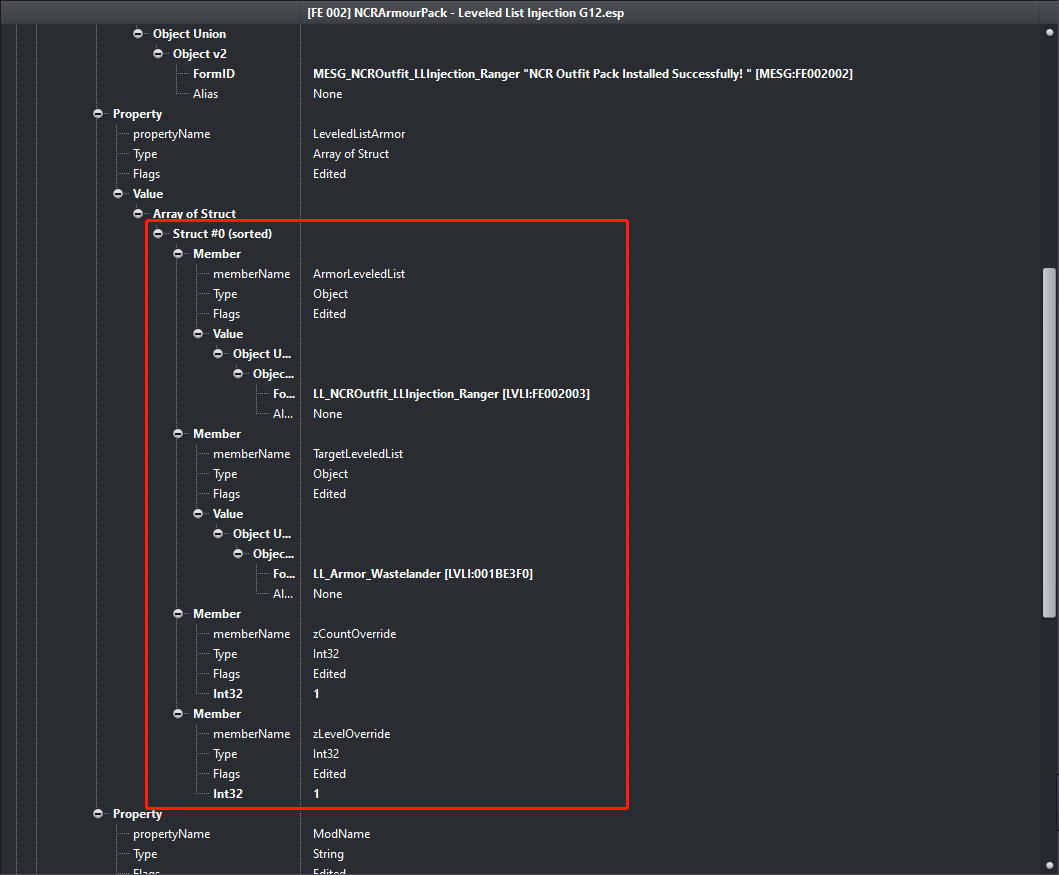
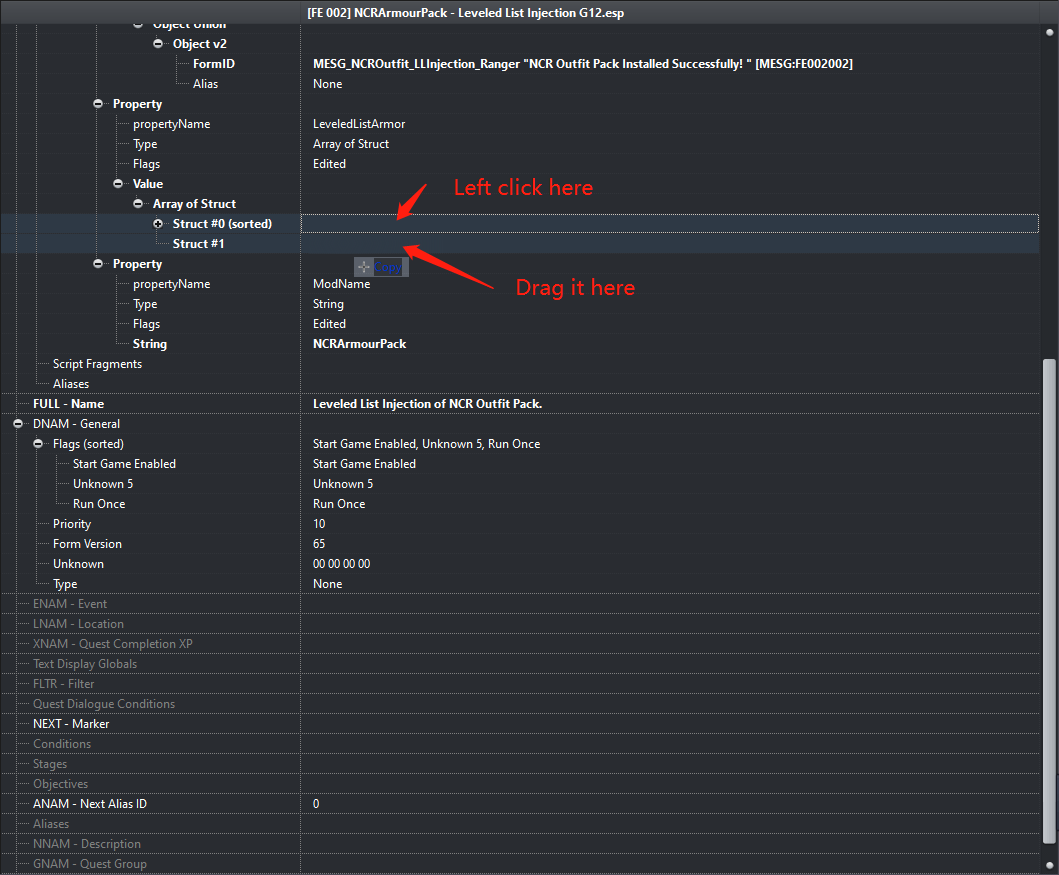
23. Now we have successfully finished one struct, when we load into our game, our script will inject our leveled list into "LL_Armor_Wastelander [LVLI:001BE3F0]". But this is not enough, we want to inject our leveled list into more basegame leveled list. To achieve it, we can create another struct by right clicking the right side of "Array of Struct" and select "Add".
24. Now collapse "Struct #0" and left click the right side of "Struct #0" and drag it to the right side of "Struct #1". In this way we quickly copy the structure into our new struct.
25. Now do the same thing as 22., now we want the target basegame leveled list to be "LL_Clothes_Wastelander [LVLI:001BE3ED]". Enter it in the correct field and set level and count if needed.

0 Comments
Recommended Comments
There are no comments to display.